It's time to revisit an old post about chromatic aberration and how
you can create the effect using the mental ray lens shader
mia_lens_bokeh. Though chromatic aberration is pretty much never
used (right?) I have seen this technique pop up on different blogs
and forums ever since. So I would like to straighten a few things out.
The bokeh map.
The bokeh map used in this first post of mine is not production quality.
Its crudely made and could produce artifacts. It is also
pretty crappy compressed. So for the love of bog or god stop
spreading it around :) !
But i won't let you hanging without a sassy bokeh map
feast your eyes on this one (click to enlarge):
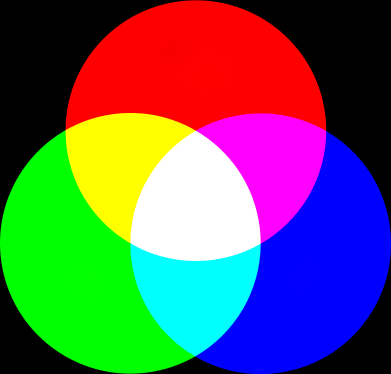
You can see the difference between the maps in the image below.
The alternative
Moving on. The technique suggested in the old post is actually to
slow and to inflexible to be used in any major project so let me present
a better and more production focused technique.
The idea is to move the effect to post. Adding the chromatic aberration
in photoshop or after effects gives you the ability to tune the look and
amount in an intuitive way. It also renders extremely much faster
and since we'll scrap the bokeh shader we can now render with the rasterizer.
In this post we'll focus on photoshop but the principle goes to any
image editor or compositor with a few tweaks.
Now lets get those artifacts done.
A. Render your image and open it in photoshop.
B. Adjust it as you normally would.
C. When the image is super nice flatten it so that all you have is the background layer.
D. Open the channels panel.
E. Move each channel a few pixels in a different direction.
If you keep an eye on the navigator panel you can monitor the
final effect as you work.
F. Go back to RGB and thats it.
The steps above is the easiest way and produces a good starting point.
To add a bit more authenticity to it one could distort the channels is
other more artistic ways. Jeremy Birn made a photshop action based
on the same idea that uses spherify , look at it here.
To take it a step further copy the flattened image from step C and
paste it as a layer under the distorted image, this way you can paint
out unwanted chromatic aberration.
A comparison of the different approaches discussed (click to enlarge)
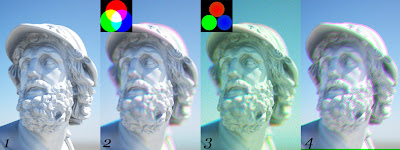
1. Original (no bokeh)
2. New bokeh map
3. Old bokeh map
4. Photoshop chromatic aberration
End of part II
Monday, August 4, 2008
Tuesday, June 24, 2008
imf_disp live
If you ever used maya for any serious production you know that
the final output most likely have to be rendered using the
command line. The reason for doing this could be;
memory issues, need of 32bit images,sequence deployed over
several computers (using a render manager or batch files).
However, sometimes you might want to check out the currently
rendering frame to ensure things are hunky-dory. This is impossible
or so it was before you read this article through. Lets skip some of
the technical mumbojumbo about sockets and image pipes and get
pretty straight to how.
imf_disp
maya comes whit a set of mental ray tools, most notable imf_copy
and imf_disp. imf_copy is mainly used to convert file textures
to mental rays memory mapped .map format. But lets talk about
imf_disp this is what we'll use to monitor our command line
rendered frame. This little image viewer has a built-in feature
to display images as they render.
So how do we use it to monitor our maya command line rendering?
Lets start imf_disp by simply typing it directly in "run" and hit enter.
Ok, we have a rendering running and imf_disp waiting...
theres no image here. We need to tell it which rendering to display.
As you might noted before as mental ray start to render an image
file is created in the output directory it looks just like your precious finalRender001.exr waiting to be filled up with those glorious pixel.
the 128kb file
Behold, it is not! It's actually more of a definition file as it contains
information about the rendering such as; width/height, host and port
at which the pixel or framebuffer could be accessed.
Notice that these files are always 128kb.
If we open one of these 128kb files up in notepad or alike
it'll look like this:
ray3.6,512,512,napalm,4389,1.000000,4104,4390
(mental ray version, width, height, host name, socketID, gamma, PID, second socketID)
When the rendering is done the designated framebuffer replaces this
info/placeholder file. If the lines above makes no sense what so ever to
you don't be afraid it makes no difference for what we are about to do.
Lets give this 128kb of information to imf_disp by dragging the file to it.
Boing! the window resizes to the expected size but where is
that damned image!? Lets fix it that right now.
solution
The key to getting it to work is really quite simple.
It is in fact one line of code. Fire up your favorite text editor
and open Maya.env located in USER\maya add this line to it:
MI_MAYA_SOCKETS = 1;
save and close.
Next time you commande line render, open the 128kb file in
imf_disp and you should see those buckets fly around.
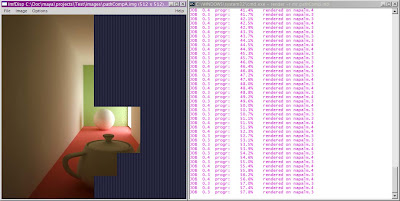
imf_disp and command line render side by side
notes
1. If it for some reason is undesirable to edit the Maya.env file
it is possible to add MI_MAYA_SOCKETS as an environmental variable
with a value of 1.
2. Some files that seem to render correctly but ends with the error code
"Maya exited with error code 210" will not display in imf_disp.
3. The firewall on the rendering machine may disturb so turn it off if
you want to ensure function.
Monday, December 10, 2007
foxCamera part 1.
Have you ever wanted to handle your maya cameras as if it were a film camera or an SLR ? Let the the shutter, f-stop, focal length etc. give you the correct depth of field and motion blur?
Well this is the goal with the foxCamera mel script.
Many rendering engines do already have this type of nodes or shaders, mental ray contains all the necessary components but there is no actual composite-node or UI of those.
Ok, so almost all of the attributes can be found on one node/shader or another. My mission boils down to two things:
1. Create some kind of interface with all of the knobs and switches in a camera familiar way.
2. Figure out the relations between the camera settings (shutter, f-stop, focal length etc.) and the different effects such as depth of field and motion blur.
Outline
The foxCamera consists of a rigging part, an interface part and a function part.
As the script is run it creates a network of nodes and sets them to drive each other via the UI and the scripts functions.
Used nodes are:
The interface
The interface is pretty straight forward divided into six parts.
Blur Switches
Controls the use of motion blur (off/exact/tranform) and depth of filed.
Camera Controls
This is the main settings for any camera. ISO speed, f-stop, focal length, shutter speed and white balance. These attributes directly drive the mia_photographic lens shader that is used. And indirectly drives the amount of blur, more on this in the info & statistics section. There is also a button to set the focus distance to the selected object. The white balance is connected to the lens via a CIE node that allows the input of kelvin values just like a real camera would. There is also a button for auto white balance (coming feature).
Artistic Controls
The artistic controls do also directly drive attributes found on the lens shader.
These attributes would represent the tuning settings found on an DSLR.
This section also controls the vignetting. As soon as I get my hands on some more info on how to calculate the proper vignetting it'll be integrated.
Info & Statistics
This sections shows the calculated values and the formulas used to get them.
And the formulas are as follows:
DOF radius = (focal length / f-stop) / 2
Motion blur shutter = frame rate(1/camera shutter)
As I'm not physicist, if you find the formulas iffy please do tell me!
The formulas comes partly from the help docs and partly from
some twisted minds.
In most cases one would like to know what values that are really used for the blur operations. Check these values to make sure that the blur is not excessive before rendering. If you have some camera experience you'll know what attributes to adjust to get the amount of blur you´re after
Quality & Samples
Basic quality settings for the different blurs.
Connected Nodes
When the script create the nodes that it needed for the foxCamera to work it does not connect it to any of the nodes used by maya to categorize it in the hypershade. Therefore they only show up in the hypershade if the user has added a custom mental ray tab. To resolve this a list of buttons for selecting the these nodes are used (coming feature).
Future
For the script to be really useful for anyone but me it needs to be made fail safe. As of today one would need only to run parts of the script to bring back a lost UI not to invoke the creation of nodes. I just might post some instructions on how to practically use it soon.
Planned Features
The auto white balance is planned to use the suns rotation to get the right kelvin value for the white balance. So for version one this feature would only be useful in a physical sky based scene.
The connected nodes feature should be fixed as soon as possible.
Ideas for Features
Use it at your own risk, I take no responsibility!
End of part 1
Well this is the goal with the foxCamera mel script.
Many rendering engines do already have this type of nodes or shaders, mental ray contains all the necessary components but there is no actual composite-node or UI of those.
Ok, so almost all of the attributes can be found on one node/shader or another. My mission boils down to two things:
1. Create some kind of interface with all of the knobs and switches in a camera familiar way.
2. Figure out the relations between the camera settings (shutter, f-stop, focal length etc.) and the different effects such as depth of field and motion blur.
Outline
The foxCamera consists of a rigging part, an interface part and a function part.
As the script is run it creates a network of nodes and sets them to drive each other via the UI and the scripts functions.
Used nodes are:
- mia_bokeh
- mia_photographic
- mib_cie_d
- miDefaultOptions
- camera
The interface
The interface is pretty straight forward divided into six parts.
Blur Switches
Controls the use of motion blur (off/exact/tranform) and depth of filed.
Camera Controls
This is the main settings for any camera. ISO speed, f-stop, focal length, shutter speed and white balance. These attributes directly drive the mia_photographic lens shader that is used. And indirectly drives the amount of blur, more on this in the info & statistics section. There is also a button to set the focus distance to the selected object. The white balance is connected to the lens via a CIE node that allows the input of kelvin values just like a real camera would. There is also a button for auto white balance (coming feature).
Artistic Controls
The artistic controls do also directly drive attributes found on the lens shader.
These attributes would represent the tuning settings found on an DSLR.
This section also controls the vignetting. As soon as I get my hands on some more info on how to calculate the proper vignetting it'll be integrated.
Info & Statistics
This sections shows the calculated values and the formulas used to get them.
And the formulas are as follows:
DOF radius = (focal length / f-stop) / 2
Motion blur shutter = frame rate(1/camera shutter)
As I'm not physicist, if you find the formulas iffy please do tell me!
The formulas comes partly from the help docs and partly from
some twisted minds.
In most cases one would like to know what values that are really used for the blur operations. Check these values to make sure that the blur is not excessive before rendering. If you have some camera experience you'll know what attributes to adjust to get the amount of blur you´re after
Quality & Samples
Basic quality settings for the different blurs.
Connected Nodes
When the script create the nodes that it needed for the foxCamera to work it does not connect it to any of the nodes used by maya to categorize it in the hypershade. Therefore they only show up in the hypershade if the user has added a custom mental ray tab. To resolve this a list of buttons for selecting the these nodes are used (coming feature).
Future
For the script to be really useful for anyone but me it needs to be made fail safe. As of today one would need only to run parts of the script to bring back a lost UI not to invoke the creation of nodes. I just might post some instructions on how to practically use it soon.
Planned Features
The auto white balance is planned to use the suns rotation to get the right kelvin value for the white balance. So for version one this feature would only be useful in a physical sky based scene.
The connected nodes feature should be fixed as soon as possible.
Ideas for Features
- Focus tracking, ability to lock focus to an object.
- A global scale parameter.
- Presets for SLR's, video cameras, film cameras etc.
- Vignetting based on lens and camera type.
Use it at your own risk, I take no responsibility!
End of part 1
Friday, October 19, 2007
Glare
Since it only took me a day to get the max 2008 glare shader to work
"properly" whit in maya I just have to spill my guts about it here.
Ok, We'll start with the basics.
What is this glare thing I keep rambling on about and why should anyone care?
Glare (known as bloom in the computer game world) is a
phenomena seen when looking into very bright light
(namely in a high contrast environments) such as the sun
a cars headlights or a lit window late at night.
The source of light seems to be "glowing", it looks light you can actually see the light mid air.
Notice the effect by the lamp.
Ok, so we covered what it looks like, but we cant really see light midair. So what the heck is this glow thing?
Unlike many other camera artifacts this effects can be seen both in images taken with a camera as well as simply looking in to bright objects with your eyes. It is caused by scattering of light in the eye (some part of it, lets not get in to biology here)
,the film in an analogue camera and the CCD on a digital camera.
Used correctly this effect will give a subtle boost to the realism of a rendering. Use it in excess and the image WILL turn in to a "german-wedding-photo-effect".
Lets get back to the shader.
The glare shader was originally written by Lume as part of there light shader set. The lume shaders now come as a part of 3ds max.
To get this shader working in maya copy the lume.mi from:
3ds Max 2008\mentalray\shaders_standard\include
to:
maya2008\mentalray\include
and the lume.dll from:
3ds Max 2008\mentalray\shaders_standard\shaders
to:
maya2008\mentalray\lib
This is all you need to do to just get the glare shader to work with maya, however the lume.mi do kinda destroy the create render node window so you need to edit that file to some extent to get it all smooth. But if you just want to fool around never mind this and just delete the files when you are done.
This shader is an output shader, that means it applys to to the rendered image as a post effect. Select your camera and find the tab mental ray>primary output passes>secondary output pass
drag the Glare shader from hypershade (mental ray tab > ouput shaders) here.
Take a few seconds to breathe...ok, lets continue with shader settings.
Quality: ranges from 0 to 4, but has to be a minimum of 3 to work.
Spread: the spread of the glare, note that the light intensity at any given point also makes the glare spread more or less.
Overlay only: Doesn't work.
Verbose: Prints the progress in the output wnidow.
Streaks: Doesn't work.
Scale: Doesn't work.
Contrast: Doesn't work.
Specific Objects: Doesn't work.
No glare.
glare
Wednesday, October 17, 2007
3ds max 2008
Today the new version of 3ds max was made available
for trial download.
The news concerning mental ray is about the same as
in maya but with a more slick OEM integration.
Ill think play around with it for o while and then
its time o try to brake out the improved glare shader
and fiddle it in to maya.. but thats another post.
glare in action
for trial download.
The news concerning mental ray is about the same as
in maya but with a more slick OEM integration.
Ill think play around with it for o while and then
its time o try to brake out the improved glare shader
and fiddle it in to maya.. but thats another post.
glare in action
Monday, October 15, 2007
Flicker free animation.
Todays experiment will ( as the title gives away ) handle
flicker free animation with mental rays final gather.
Edit:
Due to complications with my composting software I will be
unable to finish this experiment. This post will be updated as
soon as its is technically possible.
flicker free animation with mental rays final gather.
Edit:
Due to complications with my composting software I will be
unable to finish this experiment. This post will be updated as
soon as its is technically possible.
Friday, October 12, 2007
What to do when rendering.
One of mans first and most important questions:
What on earth am I supposed to do while i wait for this rendering
to finish?
I'll present 3 things which makes my rendering time fly.
1. Physically and mentally abuse the local stuffed animal.
In my case a stuffed animal in the form of a hen
(he.. yes he, is also our director).
2. Surf aimlessly around the Internet in the search for some fact no one
really needs to know, like which animal has the longest tail as percentage of there body.
3. Search the entire server for all files containing the
word force majeure (seems to be about 6 here).
I believe this image speaks for itself.
Subscribe to:
Posts (Atom)