It's time to revisit an old post about chromatic aberration and how
you can create the effect using the mental ray lens shader
mia_lens_bokeh. Though chromatic aberration is pretty much never
used (right?) I have seen this technique pop up on different blogs
and forums ever since. So I would like to straighten a few things out.
The bokeh map.
The bokeh map used in this first post of mine is not production quality.
Its crudely made and could produce artifacts. It is also
pretty crappy compressed. So for the love of bog or god stop
spreading it around :) !
But i won't let you hanging without a sassy bokeh map
feast your eyes on this one (click to enlarge):

You can see the difference between the maps in the image below.
The alternative
Moving on. The technique suggested in the old post is actually to
slow and to inflexible to be used in any major project so let me present
a better and more production focused technique.
The idea is to move the effect to post. Adding the chromatic aberration
in photoshop or after effects gives you the ability to tune the look and
amount in an intuitive way. It also renders extremely much faster
and since we'll scrap the bokeh shader we can now render with the rasterizer.
In this post we'll focus on photoshop but the principle goes to any
image editor or compositor with a few tweaks.
Now lets get those artifacts done.
A. Render your image and open it in photoshop.
B. Adjust it as you normally would.
C. When the image is super nice flatten it so that all you have is the background layer.
D. Open the channels panel.
E. Move each channel a few pixels in a different direction.
If you keep an eye on the navigator panel you can monitor the
final effect as you work.
F. Go back to RGB and thats it.
The steps above is the easiest way and produces a good starting point.
To add a bit more authenticity to it one could distort the channels is
other more artistic ways. Jeremy Birn made a photshop action based
on the same idea that uses spherify , look at it here.
To take it a step further copy the flattened image from step C and
paste it as a layer under the distorted image, this way you can paint
out unwanted chromatic aberration.
A comparison of the different approaches discussed (click to enlarge)
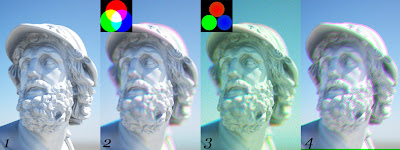
1. Original (no bokeh)
2. New bokeh map
3. Old bokeh map
4. Photoshop chromatic aberration
End of part II
Monday, August 4, 2008
Tuesday, June 24, 2008
imf_disp live
If you ever used maya for any serious production you know that
the final output most likely have to be rendered using the
command line. The reason for doing this could be;
memory issues, need of 32bit images,sequence deployed over
several computers (using a render manager or batch files).
However, sometimes you might want to check out the currently
rendering frame to ensure things are hunky-dory. This is impossible
or so it was before you read this article through. Lets skip some of
the technical mumbojumbo about sockets and image pipes and get
pretty straight to how.
imf_disp
maya comes whit a set of mental ray tools, most notable imf_copy
and imf_disp. imf_copy is mainly used to convert file textures
to mental rays memory mapped .map format. But lets talk about
imf_disp this is what we'll use to monitor our command line
rendered frame. This little image viewer has a built-in feature
to display images as they render.
So how do we use it to monitor our maya command line rendering?
Lets start imf_disp by simply typing it directly in "run" and hit enter.
Ok, we have a rendering running and imf_disp waiting...
theres no image here. We need to tell it which rendering to display.
As you might noted before as mental ray start to render an image
file is created in the output directory it looks just like your precious finalRender001.exr waiting to be filled up with those glorious pixel.
the 128kb file
Behold, it is not! It's actually more of a definition file as it contains
information about the rendering such as; width/height, host and port
at which the pixel or framebuffer could be accessed.
Notice that these files are always 128kb.
If we open one of these 128kb files up in notepad or alike
it'll look like this:
ray3.6,512,512,napalm,4389,1.000000,4104,4390
(mental ray version, width, height, host name, socketID, gamma, PID, second socketID)
When the rendering is done the designated framebuffer replaces this
info/placeholder file. If the lines above makes no sense what so ever to
you don't be afraid it makes no difference for what we are about to do.
Lets give this 128kb of information to imf_disp by dragging the file to it.
Boing! the window resizes to the expected size but where is
that damned image!? Lets fix it that right now.
solution
The key to getting it to work is really quite simple.
It is in fact one line of code. Fire up your favorite text editor
and open Maya.env located in USER\maya add this line to it:
MI_MAYA_SOCKETS = 1;
save and close.
Next time you commande line render, open the 128kb file in
imf_disp and you should see those buckets fly around.
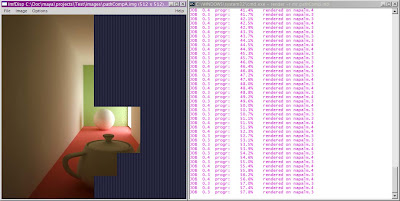
imf_disp and command line render side by side
notes
1. If it for some reason is undesirable to edit the Maya.env file
it is possible to add MI_MAYA_SOCKETS as an environmental variable
with a value of 1.
2. Some files that seem to render correctly but ends with the error code
"Maya exited with error code 210" will not display in imf_disp.
3. The firewall on the rendering machine may disturb so turn it off if
you want to ensure function.
Subscribe to:
Posts (Atom)